Last week the prompt for the #ClaireStelle8August nail art challenge was Aztec. I have always wanted to do Aztec nails, but it took a challenge to finally make it happen. That’s why I love challenges so much, they get you out of your box and improving your skills.


While I was doing this mani my husband came in and said “You should take pictures of all of this.” So that’s exactly what I did. Here is a step-by-step photo tutorial for making Reverse Stamping Decals.
What I needed for this mani…
Polishes:
M Polish Cayuga
Zoya Ziv
Zoya Pia
Zoya Nephratiti
Zoya Jinx
Zoya Channing
HK Girl Glisten & Glow
Color Club Top Coat
Supplies:
4 GP Stampers
FUN stamping plate #7
1 swatching wheel
1 small detail brush
1 small dotting tool
Acetone
Clean up brush
1) Choose a design.
Since I was doing Aztec nails I chose this Aztec image from FUN plate #7.

2) Stamp your image.
Using M Polish Cayuga I got a clean image on 4 of my GP stampers.
Note: You can do these on plastic sandwich bags or the new UberChic mat, but I prefer working directly on my stampers. You can use multiple stampers or if you only have 1 or 2 stampers just complete your decals in stages. They will hold for an hour or so with no problems.

3) Brush on a thick coat of HK Girl Glisten & Glow.
After the stamped images have had a few minutes to dry I layer a coat of HK Girl over each one. HK Girl really minimizes any chance of smearing so I do recommend using this specific top coat.
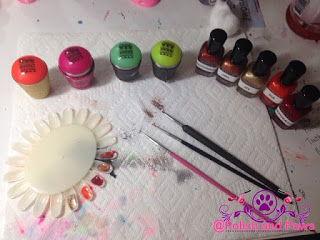
While the top coat is drying on the stampers set up your work area. No my work area isn’t perfectly neat, but the truth is nail art isn’t always neat. I prefer to keep it real.
Notice what I’m using for my polish palette? The back side of swatch wheels are perfect for dipping out a little of your polish. When working with 5 colors you definitely need to get to each quickly and easily.

4) Using detail brushes or dotting tools paint in the image.
(I use a combination of both)
After your layer of top coat is dry you start painting in your image. Remember this is Reverse Stamping so you are painting in the back side of your decals. No need to be perfect!

5) Continue painting…

6) Paint some more…

7) Finish off with another coat of HK Girl Glisten & Glow.
After you have finished filling in all your images go back over with another layer of HK Girl Glisten & Glow.

8) Prep your nails.
You want to allow a good 5-10 minutes to let your decals dry. While they are drying make sure your nails are prepped and ready. Since these were full decals I didn’t need any color on my nails. So I just made sure to have clean, dry nails and my other top coat ready.

9) Gently peel off decals.
When my decals are all dry I start to gently peel them off the stampers. I like to wait until an edge of the decal is starting to just curl up off the stamper head. I don’t use tweezers or anything like that, I just gently place the tip of my nail under the edge and slowly peel it off. Turn them over to see your finished decal.


10) Place decal on nail using top coat.
For this step I like to use a standard (not fast dry) top coat so I have a little time to properly place my decals. Hold them in place for a minute or so as the top coat dries to secure the decal in place.

11) Trim excess edges off decals.

12) Seal the decal onto your nail with one more coat of HK Girl Glisten & Glow.

13) Using acetone and a clean up brush gently wipe away the edges till you have a nice clean line between the decal and your cuticles.

14) Repeat. Until all nails are done.
And the finished mani…


Have you ever tried making reverse stamping decals? Or maybe you’re already a pro at advanced stamping techniques! Hopefully this step-by-step tutorial was helpful either way. 🙂
Leave me a comment below, I love to hear from you!
Until next time, stay polished!